Wednesday, 30 August 2017

Security Token in Salesforce

A security token is a case-sensitive alphanumeric code that you append to your password or enter in a separate field in a client application.


When you access Salesforce from an IP address that’s outside your company’s trusted IP range using a desktop client or the API, you need a security token to log in.New security tokens are immediately sent out to you when your Salesforce password is altered or when you ask for to reset your security token.


Following the step for resetting Security Token

1. Click on Name -> My Setting


2.  Personal -> Reset My Security Token -> Reset Security Token


After click on reset security token button(3) you will get an email in which your new security token will be available which you can use.


Salesforce Profiles

Profiles specify how users can access objects and data, and he can do within the application. When you create users, you assign a profile to each one or we can say Set of permissions called a profile.
·   
·  A profile controls “Object permissions, Field permissions, App settings, Tab settings, Apex class access, Visual force page access, Login hours & Login IP ranges.
·     You can define profiles by user’s job function. For example System Administrator, Developer, Sales Representative.
·     A profile can be assigned to many users, but a user can work according to a single profile at a time.
     We can create as many profile as we want it depends on number of licences Once a profile is created user cannot delete them he can only deactivate them.

Profiles in Salesforce:

1. Standard profiles: By default salesforce provide some standard profiles. These are as follows:

1.    Read Only
2.    Standard User
3.    Marketing User
4.    Contract Manager
5.    Solution Manager 
6.    System Administrator. 

  Each of these standard profile includes default set of permissions for all of the standard objects available on the platform.
  2. Custom Profiles: Custom profile are those which we can create according to our need. If we want we can delete them but if that profile is assigned to any user in that case first we need to remove that profile from the user after we can delete that. .

Navigation to access profiles: setup -> Administer -> Manage users -> Profiles


Tuesday, 29 August 2017

Salesforce Licences

A license define the baseline of features that the user can access. Every user must have exactly one license. Salesforce offers different types of licenses.

These are as follows:
1. Standard User License
2. Chatter User License
3. Communities User License
4. Service Cloud Portal User License
5. Site and Site.com User License
6. Authenticated Website User License

You can see the license from the Administrator->Company Profile->Company Information. Here you can see all the license which you have.


Add caption
 

Tuesday, 9 August 2016

Wrapper Class In Salesforce


A wrapper class is a class,data structure whose instance are a collections of other objects. It is a custom object defined by Salesforce developer, where he defines the properties of the wrapper class. Within Apex and Visualforce this can be extremely helpful to achieve many business scenarious within the Salesforce.

Here is a most commonly asked scenario, how we can display data within a table with checkbox and then process only the record which are selected:


Apex Code:
public class WrapperController
{
  Public list<wrapperaccount> acctlist;
    
    public List<wrapperaccount> getAccount()
    {
        if(acctlist==null)
        {
          acctlist=new List<wrapperaccount>();
          list<account> aa=[Select name from account];
          for(Integer i=0;i<aa.size();i++)
          {
           acctlist.add(new wrapperaccount(aa[i]));
          }
        }
        return acctlist;
    }
    public pageReference deleteaccount()
    {
        List<Account> selectedaccount=new List<Account>();
        for(wrapperaccount aa:getAccount())
        {
            if(aa.checkbox==true)
            {
                selectedaccount.add(aa.act);
            }
        }
        for(account act:selectedaccount)
        {
            delete act;
        }
        acctList=null;
        return null;
    } 
   public class wrapperaccount
    {
        public account act{get;set;}
        public boolean checkbox{get;set;}
        public wrapperaccount(account a)
        {
            act=a;
            checkbox=false;
        }
    }
}
Visualforce page Code:
<apex:page controller="WrapperController">
<apex:form >
    <apex:pageblock >
    <apex:pageblockButtons >
    <apex:commandButton value="Delete" action="{!deleteaccount}" />
    </apex:pageblockButtons>
    
    <apex:pageblocktable value="{!Account}" var="a">
    <apex:column >
    <apex:inputCheckbox value="{!a.checkbox}"/>
    </apex:column>
    <apex:column value="{!a.act.Name}"/>
    
    </apex:pageblocktable> 
    </apex:pageblock>
</apex:form>
</apex:page>

Thank you friends...
I hope it will help you. If you have any query, you can ask me anytime.
So keep reading and love technology..:)

Thursday, 4 August 2016

How to create Dynamic SOQL in salesforce

Dynamic SOQL means creation of  query at run-time using apex and get records after executing that query in your code. We can create dynamic query with the help of apex code easily.

Here is an example in which I will show you how to create a Dynamic Query with apex code:


Apex Code:

public class DynamicApex 
{
    public map<String,Schema.SobjectType> ofmap=Schema.getGlobalDescribe();
    public string selectedObject{get;set;}
    public list<string> selectedfield{get;set;}
    public string temp{get;set;}
    public string temp1{get;set;}
    public list<sobject> q{get;set;}
    
    public DynamicApex ()
    {
        selectedObject='none';
        q=new list<sobject>();
        selectedfield=new list<string>();
    }
    
    public List<selectoption> getobject()
    {
        list<selectoption> objectname=new list<selectoption>();
        list<string> mapkey=new list<string>(ofmap.keyset());
        objectname.add(new selectoption('None','None'));
        mapkey.sort();
        for(String s:mapkey)
        {
            objectname.add(new selectoption(s,s));
        }
        return objectname; 
    }
    
    public List<selectoption> getfields()
    {
        list<selectoption> field=new list<selectoption>();
        if(selectedObject!='none')
        {
            schema.sobjectType objtype=ofmap.get(selectedobject);
            map<String,Schema.sobjectField> fieldmap=objtype.getDescribe().fields.getmap();
            for(String F:Fieldmap.KeySet())
            {
                field.add(new selectoption(F,F));
            }
        }
        return field;
    }
    
    public void Soql()
    {       
          temp='select ';
          for(String field:Selectedfield)
          {
              if(Field!=Selectedfield.get(Selectedfield.size()-1))
              {
                  temp+= field+','+' ';
              }
              else
              {
                  temp+= field+' ';
              }
          }
          
          temp+='from '+ SelectedObject;
          q= Database.query(temp) ;
    }
}

Visualforce page Code:

<apex:page controller="DynamicApex">
<apex:form >
<apex:pageblock >
    
    <apex:pageblockButtons location="Top">
    <apex:commandButton value="Click" action="{!soql}"/>
    </apex:pageblockButtons>

    <apex:pageblockSection columns="4">
   
    <apex:pageblocksectionItem >
        <apex:outputLabel value="Object:"/>
            <apex:selectList value="{!selectedobject}" size="1">
                <apex:selectOptions value="{!object}"/>
                    <apex:actionSupport event="onchange" reRender="myfields"/>
            </apex:selectList>
      </apex:pageblocksectionItem>
     
     <apex:pageblocksectionItem >
         <apex:outputLabel value="Fields:"/>
            <apex:outputPanel id="myfields">
                <apex:selectList value="{!selectedField}" multiselect="true" size="5">
                    <apex:selectOptions value="{!fields}"/>
                </apex:selectList>
            </apex:outputPanel>
        </apex:pageblocksectionItem>
       
        <apex:outputLabel value="Dynamic Query:"/>
        <apex:inputtextarea rows="5" cols="50" value="{!temp}" />
    </apex:pageblockSection>
    
        <apex:pageblockTable value="{!q}" var="t" >
            <apex:repeat value="{!selectedField}" var="sf">
                <apex:column value="{!t[sf]}"/>
            </apex:repeat>
        </apex:pageblockTable>
        
        <apex:outputPanel rendered="{!IF(q.size < 1 , true , false)}">
           <apex:pageMessage severity="ERROR" summary="No records to display"/>
        </apex:outputPanel>
        

</apex:pageblock>
</apex:form>
</apex:page>

In this example after click on button you can create dynamic query and get the records in table of that query as shown above in the image.


Wednesday, 3 August 2016

How to use FieldSet in Visualforce

Fieldset is a group of fields, you can use fieldset in Visualforce page to display those fields on page. When you are using fieldset in Visualforce to display fields, then you can add,remove & reorder fields very easily. When you are doing work with fieldset then you no need to code modifications to the page.

How to create Fieldset:

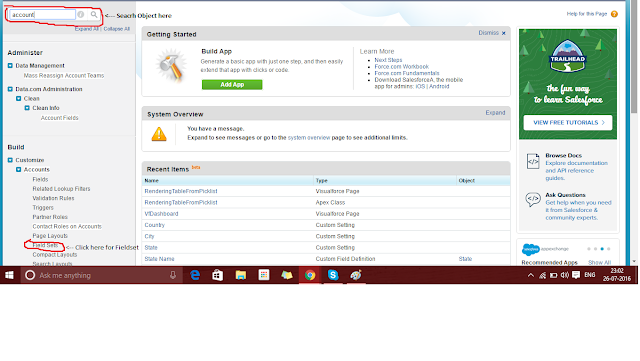
To create a Fieldset go to setup and search the object on which you want to create fieldset.


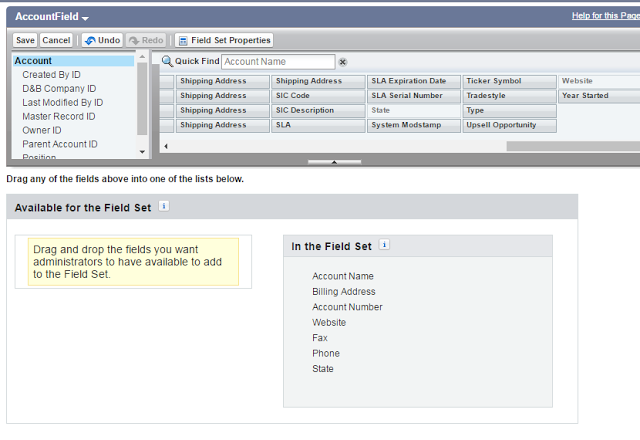
Click on fieldset and create a new fieldset, after that select all the fields which you want to include in your fieldset and then click on save button.
Now you can use your fieldset on your visualforce page and whenever you want to change the order of the fields and want to add or remove any fields on your page you can do that easily from your fieldset for this no need of coding.


Here is the Visualforce page coding which in which we are using Fieldset:

<apex:page standardController="Account">
<apex:pageblock >
<apex:form >
<apex:pageblockSection >
<apex:repeat value="{!$objectType.Account.Fieldsets.F1}" var="f">
<apex:inputField value="{!Account[f]}" />
</apex:repeat>
</apex:pageblockSection>
</apex:form>
    </apex:pageblock>
</apex:page>

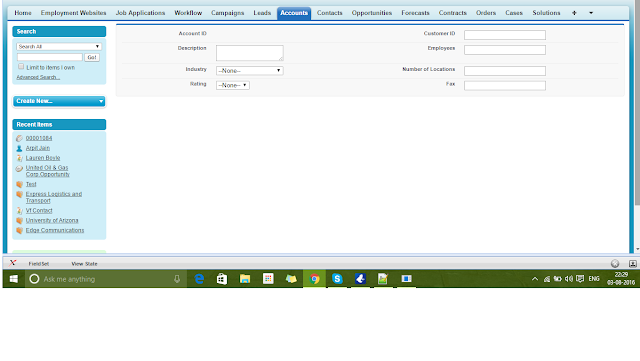
With the help of this coding we can get this result: